Sunday 31 May 2009

In Praise of Wig Jig

This is a lovely necklace set done in 20g copper wire with flattish oval beads. Just a pity I did not have more of the beads for a bracelet!
The design for the wire links is found in the booklet "Jewelry with Wire" and according to instructions was made with roundnose pliers. Beautiful and perfect! But not in my hands; all the links turned out crookedly and of different shapes and sizes. So I decided to try my trusty wig jig, arranging the pegs in the correct order, then draping the wire around them. No problem, but the loops were not closed up as in the original. Again no problem, then I used my roundnose pliers to squeeze them shut. For good measure I hammered the links before joining them with jumprings and linking them to the wired beads, and this is the result. I hope you like it!

Kumihimo in Wire

A while ago I posted some colourful kumihimo braids. Then someone commented how they would like to see a wire version. Here it is! Done in 28g sterling silver with just 8 single strands. For this I used the square braid pattern; to me it is preferable over the round braid which I think is more attractive in different colours.
If you want to try it go easy on your hands! I braided a whole metre of this in one day which was very foolish, given the gauge of wire I used. For the following three days my hands were so swollen and sore that I could only do something very easy, like coiling wire on a mandrel and no use of tools!
As I was told later by someone much more experienced than myself I should have used 30g wire or finer. Well, we live and learn! As it turned out the necklace turned out just the way I wanted and never mind the pain.
BUT: I would not do it again!

Monday 25 May 2009

Easy versatile chain links - tutorial

This is another variation of the famous U-shape. For this project I used 19g silver wire, quite tarnished. To start you need your wire, which can be 18 or 2og, they work equally well. You also need a 6.5mm mandrel to shape the U, wire cutters and stepnose or roundnose pliers. The rest is up to your fingers! To join the links I used 3.5mm ID jumprings. The size of the jumprings is a personal choice. To start straighten your wire and flush cut on each side a 4cm section. For a necklace one needs about 40 to 42 pieces. Shape all of them over the 6.5mm mandrel, making sure the ends of the wire are of equal length.
Now take the stepnose pliers and make a loop on each side facing inside the U using the smallest step . If using roundnose pliers, mark them first, so all the loops have the same size. When all the links have been completed that way
hammer them flat. Usually the loops will open abit at this stage, so make sure to close them up again.
Now you form the links with your fingers, pushing one side over the other so they overlap completely. Make sure the overlap is always in the same direction. Left over right or right over left does not matter as long as you do them all the same. Sometimes the overlap is not perfect, as shown on the left link above. When that happens insert the stepnose or roundnose pliers into both loops and tweak to adjust.
Here you see a complete bracelet with the links in the same direction.
This bracelet shows the links as opposite pairs. And both of them have been tumbled for 1 hour to remove the tarnish and wrkharden them. Now they sparkle!
These last two pictures show you the option of inserting beads between each pair of links.
The look will be quite different, but all the links are the same!

If you come up with more ideas, let me know.

Monday 18 May 2009

Rings Galore

A few days ago I had an offer to take part in a show at the beginning of June. So it was full steam ahead to increase my inventory, starting with rings. And since I love coils of all manner I decided they will form part of the design.


Apart from the pink one on the right. I will do more of them as soon as I can get some more gorgeous colours of Swarovski crystals (it seems one can never have enough!).

I was too lazy to take all pictures individually, so I just grouped some of them together for this display. Starting from top left there is black onyx with black craft wire, next is tigereye with copper, blue handcut glass bead with 30g aqua craft wire, erinite Swarovski crystal with leaf green craft wire, orange quartz in copper, olive cat's eye with light leaf green and finally another tigereye but without the added coil.

A  visitor who saw the rings got quite excited and was asking if there could be earrings and pendants to match!? This will need some figuring and re-designing. If I succeed I will show you the results!

Saturday 16 May 2009

Back to the Ancients

Jewelrylessons.com has a monthly theme to create an item pertaining to the subject given. For April it was "Cleopatra's Jeweler". I decided it would be fun to participate and came up with this design. Truly ancient, because the coil or spiral has been found in all cultures from earliest recorded time.
The design is old, but when worn it is the latest! There are things that never age. This is one of them! And best of all it is not difficult, just a bit time consuming. So go ahead and try your own!

Tuesday 12 May 2009

Still in macramee mode

After completing the copper bracelet I repeated the pattern in two shades of leaf green. The purple bracelet uses only a half (square) knot and therefore spirals. Similar to DNA with it's double helix! 
I want to be more adventurous with all the macramee knots and today tried the beautiful Josephine knot.It turned out alright but was a bit lumpy - why I used 10g wire I don't know. Therefore no picture.
By the way, macramee in wire is easier on the hands than any done in string, rope or cord. Using the latter one really needs force to keep the knots from sliding or opening, but this problem does not arise with wire, because once bent and knotted it just stays in place, even when one uses multiple strands. Hopefully I will show you an example next time. 

Sunday 10 May 2009

Macramee - Another String Art

Macramee is another very lovely string art, invented by sailors as history tells. There are just a few basic knots with loads of variations. I find that for wire work the square knot works the best. It is also one of the simpler ones, once learned never forgotten.
So here I show you a bracelet done in square knot with copper wire, 20g for the core and 24g for the knotting.
You should try it, it's fun!

Wire - String Art Embellished

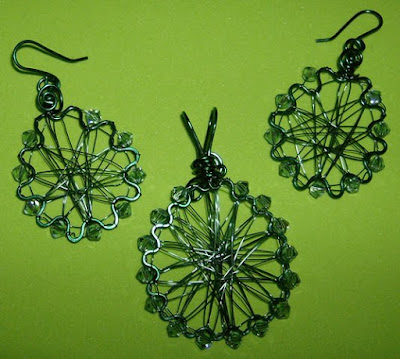
Playing some more with frames for stringing the wire it occurred to me  that the wriggly frame is actually quite nice when embellished with 4mm Swarovski crystals. Gives a little bling to the set! I will definitely make more, in different shapes and colours as well as changing the pattern of the stringing. Just had to share this one. Enjoy!

Saturday 2 May 2009

Correction

Reading through my last post again I realized that I made a mistake!

If you want the clasp to look like the links you have to attach it last (with single or double jumpring, even though I said there are no jumprings in this chain), so it will hook into the first link. If you decide to place the hook at the beginning you will have to complete the chain with an eye so it can close.

I am sorry for the mistake!!! Next time I vet what I post properly, so that there will be no confusion.

There is also a big THANK YOU to Lisa of http://abeadaday.blogspot.com for featuring my work. Go to her blog and see the inspirational thing she has to offer!

Latest Post

THE TASTIEST PINEAPPLE-GINGER JAM

There are many different types of commercial pineapple jams to be had, some good, some bad and others terrible. Most contain preservatives a...