Wednesday 15 February 2017

Baked Akara!

Akara in Yoruba and Kose in Hausa, these deep fried bean cakes are enjoyed all over Nigeria. Traditionally they are made from dried black-eyed beans or honey beans, soaked overnight and skins removed. Then they are put through a grinder with onion, salt, tatashe ( a large type of hot pepper) and maybe one or two other ingredients, depending on locality.
Then oil is heated in a large basin and the mixture is dropped in by the spoonful, turned over once or twice and fried until golden brown. When done they are drained on newspaper which does take up the excess oil to a certain extent. Finally wrapped in fresh newspaper the akara are sold to the waiting customer.

For a long time I was racking my brain how to recreate the deliciousness of akara without the process of deep frying, because any food saturated with fat is an absolute taboo for anyone with heart problems, high cholesterol and/or diabetes. So a healthy version was needed, especially since beans are highly recommended for anyone with these conditions.


Baked akara


So I tried baking the mix with the addition of baking powder but all I got was a soggy mess. After several attempts I gave up. Then I stumbled on some bread recipes made with bean flour and that triggered a few flashing light bulbs! 

This time my experiment turned out to be a winner! Therefore I will share my recipe so that anyone with health concerns can enjoy their akara!

Ingredients:
1 cup bean flour
3/4 cup lukewarm water 
3/4 tsp salt
1 tsp dried active yeast plus a pinch of sugar
1 Tbsp regular flour
1 1/2 Tbsp vegetable oil
1 small onion, chopped finely
1 small hot pepper (I used Scotch Bonnet), seeds removed and finely chopped

Other items:
mixing bowl
whisk, wooden spoon
measuring cups and spoons
small jug for the water
muffin tin, greased
saute pan

Method:
Sift the two flours together with the salt into the mixing bowl. Stir yeast and sugar into the water, cover and allow to stand for 5 - 10 minutes.
Meanwhile heat the oil in the saute pan and gently fry the onion and pepper for a few minutes until onion is translucent. Take off the heat and allow to cool.
When just warm pour over the flour mix and stir in. Then add the dissolved yeast and whisk to get rid of any lumps.
Pour into the muffin tin, dividing batter equally, not more than half full for each. Cover with a dishcloth or a sheet of plastic and allow to rise for an hour or two in a warm place. The batter will not rise too much because bean flour does not contain many carbohydrates. The extra flour added will allow the yeast to lighten the batter. When ready the batter will have a spongy, mousse like texture and should have risen by half.
Preheat oven to 180 C - gas mark 4 - for 5 minutes, then place muffin tin on middle shelf and bake for 15 minutes. When a toothpick inserted comes out dry and clean remove from oven and transfer to a cooling rack for a few minutes before serving.
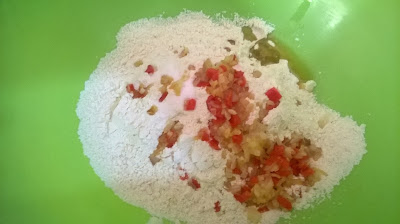
Bean flour with the fried onion/pepper mix
This quantity makes six akara, depending on the size of your muffin tin.  The recipe can easily be doubled. Any leftover bean cakes can be frozen and reheated in a steamer when needed.


Doubled quantity baked in a different muffin tin


Saturday 4 February 2017

Make Your Own Yoghurt!

Many years ago a friend of mine in Kano told me how to make my own yoghurt which I have done off and on with good results. After a while flavoured yoghurt in little pots became fashionable and of course, the children preferred that. Later still real fruit was added, fruit which was not easily available in Nigeria and does not even grow here. Naturally one wants the best for the kids and I bought those as weekly treats.

Looking back I now know that this was foolish, expensive and quite unnecessary! So I want to encourage the younger generation to always provide the very best they can which in my opinion is always made at home.

Homemade, because one is totally in control of what goes into the product. In this case it is yoghurt, full fat, rich and creamy!

Just buy a pot of natural yoghurt without any added sugar and you are ready to start. You will need milk, a saucepan, a whisk, a jug for mixing, a container for maturing the yoghurt and a measuring gadget. A thermometer is not needed, your little finger will do nicely!

I have researched various recipes and I am sure they all work perfectly well but are not ideal for a hot climate. Therefore my method will give excellent results in sweltering conditions!

Measure 500 ml milk and put in your saucepan. Measure 120 ml (1/4 cup) of the purchased yoghurt and place in mixing jug. Put the saucepan on the fire for a few minutes. Dip your little finger into the milk to test. It should not be hotter than a baby's bath water! If it is too hot you have to allow the milk to cool down, otherwise you will get cheese instead of yoghurt! Another way to test is to dip a spoon into the milk and touch it to your lips. You will know it is too hot if you get a burning sensation. A little warmer than lukewarm is alright. Remember we are in the tropics and a little heat goes a long way!                                        

Yoghurt and milk mixture
                                                                                         
When you are satisfied with the temperature take 120 ml of the milk and add to the yoghurt, whisking to remove any lumps. When smooth, slowly add the remaining milk, whisking gently to distribute the yoghurt mix. Now pour into the container you have chosen and put the lid on. In a warm kitchen the yoghurt will have set in four hours. Average temperature in my kitchen is between 30C-35C(86F-95F).
       
The setting stage
                                                                                                                                                   

Yoghurt is set and ready to be placed in the fridge
                                
When chilled, serve with chopped fruit of your choice. Good options are sliced bananas, cubed mangoes or pawpaw. Instead of milk, this yoghurt could be used for muesli or cornflakes with some fruit added, so no extra sugar is needed!  
                                                        
Don't forget to keep some for the next batch!                                                                                                                                                  
                                                                    

Latest Post

THE TASTIEST PINEAPPLE-GINGER JAM

There are many different types of commercial pineapple jams to be had, some good, some bad and others terrible. Most contain preservatives a...